 |
Sunbeam Iron
Photo from consumerreports.org |
Since purchasing my industrial sewing machine I have found that I sew a lot more at home instead of at school. While my sewing machine is amazing and 100x better than my domestic sewing machine (which still has its merits), my garments don't always have the same quality that they do when I'm at school. The main reason for this is that I have a domestic iron (Sunbeam) and a $14 ironing board. Seams don't press as flat because the iron doesn't get as hot, and when pressing up hems it doesn't hold because there is too much moisture since the board doesn't vacuum it out. So in order to remedy the situation I have been researching irons(hoping I can find an affordable solution).
 |
Reliable i700 Professional
Photo from reliablecorporation.com |
The irons we use at school are from a brand called Reliable, and the model is (or is similar to) the i700 Professional. This would be my dream iron (this post seems a little sad as I'm talking about 'dream irons'). What you see in the photo is the actual iron press and the water tank/heater. The pressure on this iron is pretty intense, and can steam for up to 8 hours continuously. Unfortunately, unlike the quick domestic irons, this model takes 30-40 minutes to heat up. The other downside to this amazing iron is the price. This sucker sells on the Reliable website for $1299.99. Definitely not in my price range, and very unlikely to find used.
 |
| Reliable Velocity |
I found another iron on the Reliable website, called Velocity, that is for home use that seems like it would be a great upgrade for my Sunbeam. $99 is still quite a bit more than I spent on my Sunbeam, but it claims to press like a professional iron. It also claims that it has no spitting or leaking (which mine does.... all the time..). And to top it all off, it's a really cute design. Though I don't feel as though it's as close to the industrial that I can get.
 |
| Reliable IronMaven |
A step up from this iron seems to be Reliable's IronMaven. This iron can take up to 5 cups of water for steaming, which means a longer time inbetween refills. The iron is separate from the water tank, and the movable tray allows for you to place the iron anywhere while it collects steam. One of the downsides to this iron is the size and portability of it. The next is that it is $299.99 which, while much lower than the i700, is probably out of my price range until I have a permanent studio set up.
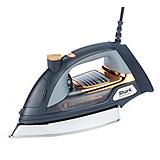 |
| Shark Ultimate Professional Iron |
Another option is under the Shark brand. I have used my mother's Shark and I have found that it has quite a weight to it, but makes a nice press. This iron is sold at Canadian Tire for $120 and has 5 star reviews. It is called the Shark Ultimate Professional Iron. I'm not sure how great this iron is as the website does not give much in the way of details, but from my experience I would think it might be a decent alternative.
 |
| Reliable 624HA |
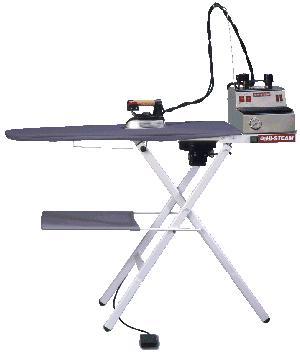
As for ironing boards, the one we use at school has a vacuum suction to suck out the steam and moisture from the garment. This makes for a sharp press and easy fusing. The school board usually also has a sleeve board for pressing. The Reliable 624HA Professional Vacuum Board Pressing Table is very similar to our school model. The sleeve board is also heated which helps to evaporate the moisture. Unfortunately this board sells for $1699, again out of my budget.
The closest home board they had on the Reliable website was still out of my price range. The C81 Vacuum & Up Air Ironing Board has a similar vacuum and air blowing features and heated board. The cool part about this board is that it folds up like a regular home ironing board. This board sells for $499.
The next closest board I could find was this board off of allbrands.com. I'm not even sure of the name of the board, but it, again, has similar features to the 624HA. This board sells on the
website for $399, still really expensive.
Overall, I think finding a similar iron for home use is do-able, but finding an ironing board with vacuum suction in my price range is next to impossible. I feel as though the ironing board is the part that will make all of the difference in pressing my garments. Any additional links or suggestions would be greatly appreciated!

 I have been craving chocolate but have nothing but cocoa powder so I was searching for something simple and fast I could make to satisfy my craving. I came across a recipe that is simply chocolate and peanut butter and it tastes amazing. Click here to go to the original website. I have given this recipe a name and I found that in order to make 30 dots nicely it's better to double the recipe (my doubled recipe was about 32 dots). Below is the doubled recipe.


